Deploying store apps in Intune – the integrated way

In the world of Mobile Device Management systems, Microsoft has been working from a different angle than many of its competitors when it comes to how they have addressed security. Instead of creating additional layer of proxied solutions, the core has been built around having security at the heart of the products. When moving the MDM component of the Enterprise Mobility + Security suite to the Azure portal, Microsoft hasn’t held back on the new features that are being pushed through the portal.

Integrated app store search

With the launch of Windows AutoPilot, Microsoft initiates a serious step towards having a single console for all management, independent of what device that is used. Deploying apps to a mobile device has traditionally been done through finding the URL for the app in each respective app store, copying that URL and then entering it into the MDM system of choice, Intune included.

The latest addition is the integrated store search in the Intune on Azure portal. The process is as smooth as click-click-search, all in the Azure portal.

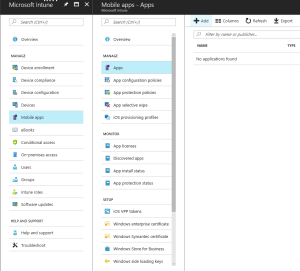
In the Intune portal, going to the Apps section displays the apps that have been deployed in the environment.

By clicking the encircled “Add” button in the top menu, the Intune add app blade is shown.


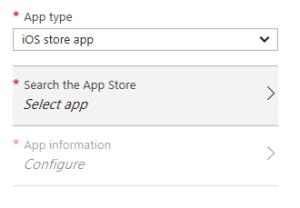
Coming from the traditional choice of either an iOS app, Microsoft has expanded the options of app distribution quite substantially. Apart from the traditional platforms, Office 365 Pro Plus Suite is now available as a readily available option. Going for the traditional iOS store app will however give a completely different layout. When clicking the “Select app” option, a direct integrated search of the Apple AppStore is shown, giving the admin a direct way of deploying the app. Gone are the additional steps of jumping between portals!

Selecting the app of choice doesn’t just select the app but pulls the additional information about the app straight into Intune, making it readily available for deployment. Yet another major change is the automatic pull of the official app icon and yet another step in app deployment is thereby gone. The app icon can of course be changed, but the default icon is the standard icon from the AppStore of choice.


Wrap-up

Microsoft is continuing to work with the Intune platform and this is just yet another addition to this journey. I will be covering more of those options in future posts so keep visiting for further info.

/JRAMTheTech
Windows Server 2016 TP4 – Hyper-V summarization

It’s out there – and it’s new

There are quite a few news when it comes to the TP4 in terms of virtualization. One of them being the ability to run nested virtualization all out there. Yet another being the possibility to run Powershell direct, meaning to be able to invoke a Powershell command directly into a VM. My personal favourite is the ability to do a rolling cluster update, hence introducing new cluster versions of a cluster OS into a 2012R2 Hyper-V cluster.

Read more of the news in Technical Preview 4 in terms of Hyper-V on

https://technet.microsoft.com/en-gb/library/dn765471.aspx


Att få ComhemPlay att fungera i Windows 10

Sedan dess att Comhem AB bytte ut sin on-demand-tjänst TivoToGo mot Comhemplay så har onlineversionen inte gått att använda på ett enkelt sätt i en webbläsare i operativsystemet Windows 10. Detta är guide till hur du får Comhemplay att fungera i din Windows 10-dator genom att använda webbläsaren Internet Explorer.

För att kunna använda dig av nedanstående instruktioner så behöver du ha inloggningsuppgifter till Comhemplay.se. Guiden kommer att utgå från en webbläsare på svenska.

STEG 1  – hitta Internet Explorer i Windows 10
Från och med Windows 10 så är det inte längre Internet Explorer som är standardwebbläsare i operativsystemet – det är istället webbläsaren Edge. Internet Explorer finns fortfarande där, men behöver sökas fram för att kunna användas. Gör på följande sätt för att hitta Internet Explorer och göra det lätt tillgängligt:

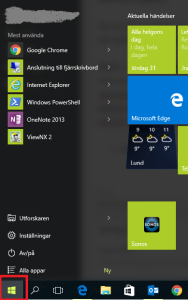
  1. Klicka på startknappen för att öppna din startmeny
    startmenu
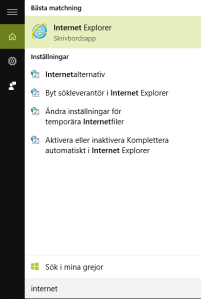
  2. Utan att klicka någonstans ytterligare, skriv “internet” och klicka sedan på “Internet Explorer”.
    ie-search
  3. Nu startar Internet Explorer, precis som du är van vid det.

STEG 2 – installera ViewRight plugin och aktivera

Skriv in comhemplay.se i adressfältet och tryck sedan på Enter.
comhemplayse

  1. När du kommit till sidan, klicka på “Logga in” i överkanten av sidan.
    LoggaIn
  2. När du visas inloggningssidan, klicka på “Get the player”-knappen.
    Inloggningsruta
  3. Längst ner i din webbläsare ser du nu en fråga om du vill spara eller köra filen som just börjats laddas ner. Välj att köra filen och vänta in att den laddas ner. Om du får en fråga om du vill tillåta att programmet får göra ändringar i datorn, så klicka “Ja” eller “OK” på den frågan.
  4. Innan du fortsätter med installationen, stäng alla webbläsare inklusive den Internet Explorer som du använt för att hämta ner programmet. Fortsätt därefter med att installera tillägget ViewRight.
  5. Starta Internet Explorer igen och gå till http://comhemplay.se. När du startat webbläsaren ska du få en fråga i nederkant av webbläsarfönstret om du vill aktivera tillägget för ViewRight. Välj att aktivera det, antingen bara genom att klicka på knappen “Aktivera” eller genom att trycka på pilen på samma knapp och välja “Aktivera för alla webbplatser” – effekten är densamma för just Comhemplay.se
  6. Logga in på samma sätt som i stegen 4-5 ovan. Bläddra till den del i ComhemPlay-portalen som du önskar använda och starta ditt favoritprogram.

STEG 3 – Skapa en direktikon för Internet Explorer (ej nödvändigt)

Om du i vanliga fall använder dig av en annan webbläsare än Internet Explorer för att visa webbsidor så kan kravet att använda Internet Explorer verka fel och jobbigt. För att slippa detta kan du istället skapa en genväg på skrivbordet som öppnar ComhemPlay direkt i Internet Explorer. Gör följande:

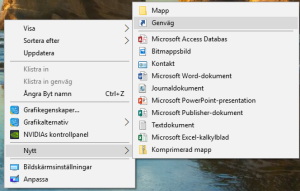
  1. Högerklicka var som helst på skrivbordet, välj “Ny” i menyn och sedan “Genväg”
    NewShortcut
  2. Om du använder en 64-bitars version av Windows 10 (det vanligaste på vanliga persondatorer), kopiera och klistra in nedanstående text i textrutan som kommer upp
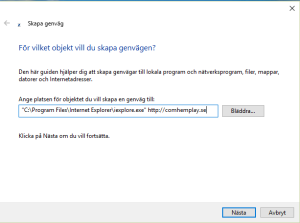
    “C:\Program Files\Internet Explorer\iexplore.exe” http://comhemplay.se
    NewShortcutLink
  3. Klicka på “Nästa”
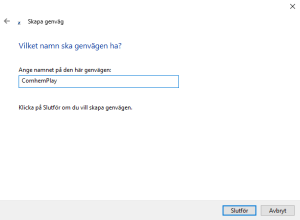
  4. Skriv in namnet på genvägen så som det ska synas när det visas på skrivbordet.
    NewShortcutLink2
  5. Klicka på “Slutför” för att skapa genvägen.

Guiden publiceras utifrån hur situationen ser ut 2015-10-31.

Revealing the news in Hyper-V vNext

Having just landed the ability to see how the new features of Microsoft latest Server OS is to behave in the datacenter, sharing the access to the nice Technet listing about the new features in Hyper-V seems like mandatory for those of you following this blog.

Among the interesting parts of Hyper-V specifically are:

  • Rolling Cluster updates, the ability to have different versions of Windows Server in the same cluster – this will for sure simplify cluster updating
  • Hot add of memory and network adapter, an ability longed for which is further simplified by the all synthethic fabric in the hosts.
  • Compatibility with connected standby, the feature of being connected even if not fully running.

See more of the details in the listing here.

Controlling the who, when and how of data access

Making every piece of information count

I have been following the strategy that larger corporations adopt on how to handle corporate data and how to keep it safe while still enabling for users to be able to work wherever they need and want to. What most often comes out from the inventorial work is a common denominator; the stress about not being able to control who that actually has access to the data, on what device and at what time. Providing for such a seamless access tend to be cost intensive if provided from the inhouse datacenter and apart from requiring an on-premises, highly available infrastructure, it also requires personnel with an adequate level of competence to maintain the solution. Apart from political reasons, the cost of at all providing such a solution makes the issue a too big a problem for the organisation to make use of the inventory at all.

As cloud services are more seamlessly integrated now than ever and services like Dropbox, OneDrive and Google Drive provide for easy access and editing possibilities from virtually any device of our choice, the controlling portion of keeping data safe is an even harder problem to solve. As the privately utilised functionality is out there, available to use, the employees are not just used to having it for their private usage, but expect to be able to use the same or similar functionality for their work materials. So the question to answer is: How do our organisation keep our files safe, independent of where they are and how do we fit that into out IT budget?

At TDC, keeping data safe is all about keeping track of what identity that is accessing a certain resource at all times. Through a rigorous framework of having integrated the already utilised Active Directory structure, securing the files is as easy as templates and keywords. I personally believe that providing for a rigid authentication mechanism for how data is accessed is the foundation on which you can access to the cloud services that your users already know how to use. As the factor of recognition is sometimes even stronger than the actual featurelist of a certain software, providing for access to the services that the employees already recognize is a success factor in software adoption. By using the approach of controlling identities and automate how those are provisioned to the cloud services in question, I personally believe that providing for a secure access path to cloud storage can be achieved.

Taking the access for the individual files to the next level is using the cloud to provide for document securing solutions. I personally prefer using the Microsoft technology named Azure Rights Management Services (Azure RMS). This functionality gives organisations the possibility of controlling access to documents, emails and other files within the organization ecosystem, all built on the robustness of Azure Active Directory Premium (AAD).

If you are interested, please let me know and we are more than able to assist you in how to get further in your cloud strategy for mobile data.

CU6 available for System Center 2012 R2

CU6 available for the System Center 2012 R2 Suite

And so it is official – Microsoft has released the Cumulative Update nr 6 for its System Center Suite. As I am primarily into virtualization, the Virtual Machine Manager component is of primary concern for me as a virtualization guy.

Find the downloads, instructions and Microsoft support team instructions on the link below.

https://support.microsoft.com/en-us/kb/3050317

Build a portable lab on external disks in Windows 8.1

Lacking disk space but need a lab?
Go external!

So, the time has come where you realize that you need to have a lab Environment but don’t want to spend a fortune on neither servers nor en extremely expensive laptop that is fit for the job. This blog post is about how to create a lab Environment that is more or less mobile, along with your computer of choice.

Prepping the hardware

So, what is needed? In order to create the most simple lab Environment, you are going to need

  • An external drive enclosure for a 2,5″ HDD, preferably USB 3.0 compatible
  • An SSD of size and speed that fits your budget
  • Optional: An external mechanical drive with storage capacity of 300 GB or more
  • A computer with a virtualization enabled CPU and at least 8 GB of RAM
  • Windows 8.1 (preferably the x64 version)
  • Time

For starters, make sure that virtualization is enabled in BIOS for the computer. This is a hassle to deal with once the Environment is up and running. The procedure is different in different BIOS systems; consult your hardware manufacturer in what procedure to follow in order to enable the functionality.

Mount the SSD drive into the enclose and verify that it is discovered when plugging it in to the computer. Open Disk Management (diskmgmt.msc) with Administrative permissions and verify that the disk is showing. Select the unallocated space and create a partition stretching the entire disk and assign a drive letter that is not in conflict with any potential network drives to which you might be connecting. When having created an NTFS formatted drive, create a subfolder on the drive named Hyper-V and in it two folders named VMs and VHDs.

Having added the disk, open Control Panel and search for the term “features” and click the text “Turn Windows Features on or off”. When being presented with the list of features that can be enabled, check the list item “Hyper-V” and make sure that all sub features are checked. Finish by pressing “OK” and await for the configuration changes to be effective. Upon being requested to restart the computer, please do.

When returning to the freshly restarted system, from the Start screen type “Hyper-V” and open the new utility “Hyper-V Manager”. The MMC console that is presented to you is the management tool for handling both the internal Hyper-V installation and, at the same time, enabling you to manage any remotely connected Hyper-V host to which you have admin access. Select the name of the local computer in the left tree pane and click the text “Hyper-V Settings…” in the right pane. In the section “Virtual Hard Disks” being presented to you, please change the default location to the drive and folder structure that you previously created on the faster SSD drive with the “Hyper-V\VHDs” as your target folder. Apart from this, leave the defaults and press “OK”.

If you have the optional part of another external disk, make sure that the volume on the disk shows up in Windows Explorer. Create a similar folder structure on the secondary disk with “Hyper-V\VHDs” and if you are really short on disk space on your local hard drive, yet another subfolder named “ISOs”. Copy the ISO files from which you wish to install the operating systems into the ISOs folder.

Once all the above is done, you are now ready to start deploying virtual machines but they won’t have any connectivity. In order for the VMs to have network connectivity, you need to create a minimum of one Virtual Switch. Hence, open “Virtual Switch Manager…” in the “Hyper-V Manager” to create a virtual switch. Make it of the type “External” and bind it to the network card through which you wish that your VMs are to connect to the outside world. Make sure that the check box “Allow management operating system to share this network adapter” is checked in order not to cut off your own Internet connection from the Windows 8.1 install your’e running. When creating the switch, Windows will disconnect your Windows 8.1 installation from the physical network adapter and then connect an intermediate virtual switch in between. All your VMs, as well as your so called Parent Partition, will communicate through the virtual switch. Hence, allowing for the Windows 8.1 install to be able to connect to the virtual switch. Make sure to name the switch according to what kind of connection it represents, for example “External-LAN” or “External-WLAN” if the network card you are binding to is the wireless network card of your computer.

Finish the configuration of the virtual switch and you are good to go in configuring your virtual machines in your external hard disk lab.

Upcoming post: How to perform a Hyper-V cluster upgrade with zero downtime using Virtual Machine Manager 2012R2